Be sure to tag #CGHRibbonLoonyBraid on your recreations of this hairstyle on Instagram and Twitter! We will be searching your photos and posting some of them on our CuteGirlsHairstyles Instagram page this week!
* ~ * ~ * ~ * ~ * ~ * ~ *
My voice has not yet recovered from being sick, so this week my daughter Bailey offered to film one of the hairstyles she has been wearing lately … which I felt was very thoughtful!
It actually brought a tear to my eye when she volunteered! I was all ready to film a more difficult hairstyle, and became frustrated when my voice was not responding well. She noticed on her own as asked me if I would let her demo her own hairstyle. I so appreciate her for that {and much, much more}!
Many of you loyal readers have seen our Loony Braid tutorials in year past, and this version is a variation that Bailey uses with her favorite color of ribbon as an accent.

 This braiding technique creates such a fun and beautifully-accented braid, and can literally be done in approximately two minutes!
If you know how to create a simple three-strand braid… then this hairstyle will be a cinch!


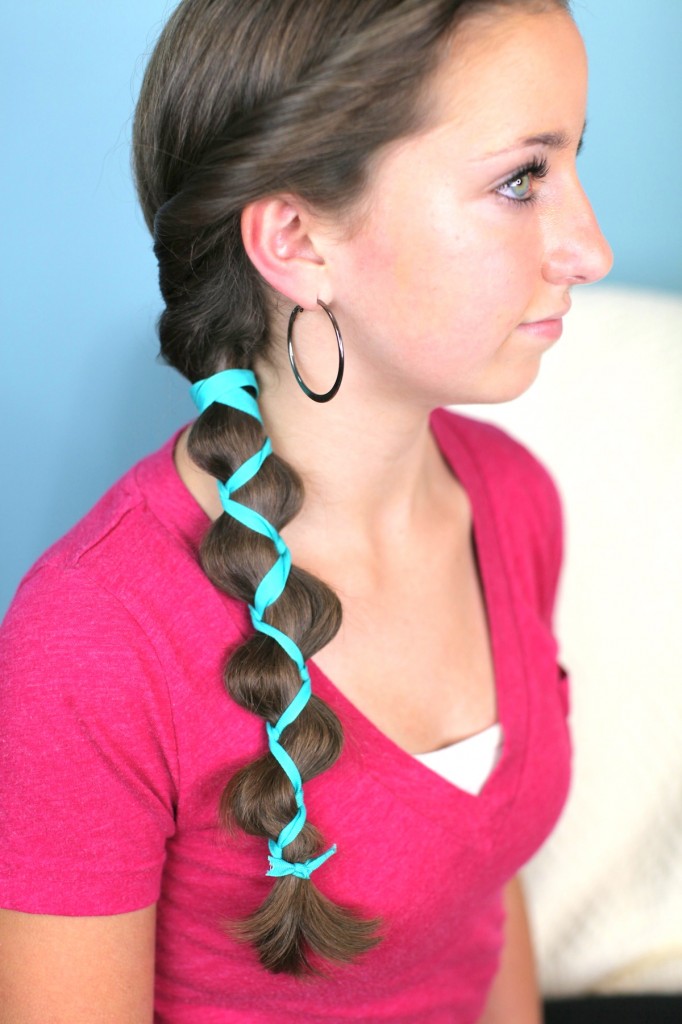 We show you below how to create a simple side loony braid, however you can use this braid in a pair, or in any number of hairstyle combinations {like tiebacks, hidden braids, etc}.
Enjoy!
Items Needed: Brush, rat-tail comb, spray bottle, 1 hair band, 2 yards {2 meters} of your favorite color hair ribbon, hairspray or pomade {if desired}.
Time Requirement: 2-3 minutes
Skill Level: Easy
Step-by-Step Instructions:
{Optional} Bailey began with her hair twisted back away from her face, to keep her bangs and layers under control…. Begin by securing the hair into a low ponytail, over one shoulder, with a hair band… Next, take the end of the ribbon {about 6 feet or 2 meters long} and thread it through the elastic… Pull the end of that ribbon through the elastic until both ribbon strands are exactly the same length {about 3 feet or 1 meter each}… Take one side of the ribbon and wrap it around the hair band to help hide… Now, cross the ribbon pieces to tighten and secure it around the elastic… You should now have three total “strands,” two ribbon strands and one large hair strand {to help control fly-aways, you may choose to apply a good pomade to the hair strand}… Begin a simple three-strand braid using those three strands… When your braid gets to the end of your hair, tie the two ends of the ribbon into a knot to secure the hair in place… Cut off any excess ribbon with a small pair of scissors {adult supervision required}… Lastly but not least, gently tug on the elbows of the braid which helps them to pop out in between the ribbon strands. This effectively creates the “Loony” part of the braid. Add hairspray {if desired}.Please feel free to leave me a comment below letting us know what you think of this hairstyle! As always, if you loved this hairstyle, please feel free to share it!
Happy Hairdoing!

For anyone wanting to learn how to be fashionable on a babysitter’s budget, you will need to view BrooklynAndBailey’s first episode of their Thrift Store Fashion Show series below…