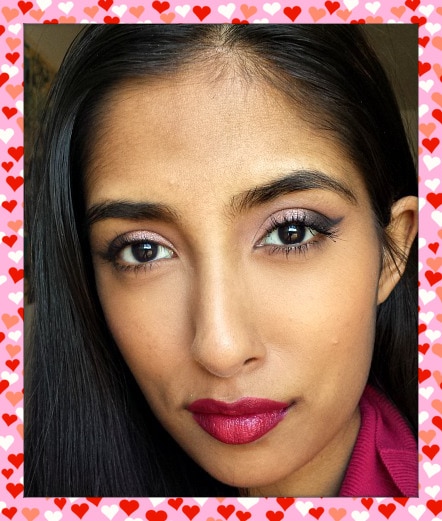
Can you feel it? Can you feel the love? Nothing feels better than feeling the love. That was an appropriate throwback to a That’s So Raven episode since it’s Valentine’s Day! (Well, almost.)
This week, I’ve collaborated with the lovely Michelle, who created a day-to-night outfit for the special day. With your outfit selection completed, I’ll show you how to pair it with a Valentine’s Day makeup look that can be amped up for the evening.
Sidenote: If you are new to makeup and need guidance, I recommend checking out my basic eye tutorial to learn all about the various techniques and terms, as well as an in-depth, step-by-step guide for applying eye makeup.
Table of Contents
For Daytime: Step 1: Step 2: Step 3: Step 4: Step 5:For Nighttime: Eye Makeup:The Finished Look:Lip Color:What do you think?For Daytime:
Let’s start with the daytime look. Just apply concealer, foundation, etc., like you normally would, then follow the steps below to learn how to create a pretty eye makeup look for Valentine’s Day. I tried to keep all of the makeup drugstore-friendly, so you might have a few of these products already lurking around in your collection!
Step 1:
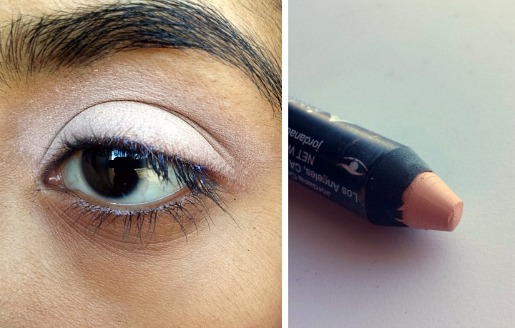
Click image to enlarge.
To start, I primed my eyelids with a matte shadow stick. I use this because it allows my eyeshadow to stay on longer and apply smoothly, and also hides any discoloration (such as veins or redness). The light color also helps eyeshadow look more vibrant. Regular primers, such as the Urban Decay Primer Potion, do assist in the longevity and vibrancy department, but a light-colored base provides extra assistance.
The shadow stick I used was Jordana Cosmetics 12 HR Made To Last Eyeshadow Pencil ($3.99) in “Continuous Almond” – I found mine at my local Walgreens.
Step 2:
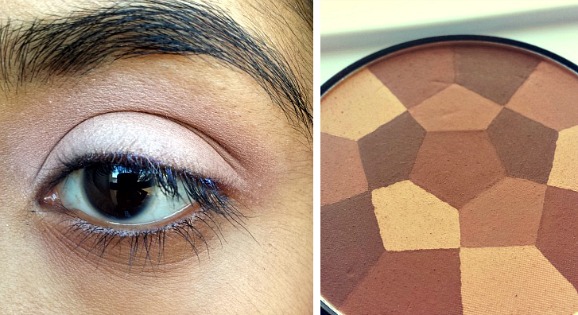
Click image to enlarge.
Next, I applied a crease color from a bronzer. Yep, that’s right. I used a bronzer for my eye makeup look. You probably have a bronzer lying around, so go ahead and apply it to your crease.
Don’t know what a crease is or where to place a crease shadow? Check out my basic eyeshadow tutorial to learn more about eyeshadow than you ever knew was possible to learn.
The bronzer I used is the New York Color Color Wheel Mosaic Face Powder ($4.50) in “All Over Bronze.” I simply swirled my crease brush (Real Techniques Deluxe Crease Brush from their Starter Set) into the bronzer, then applied it to my crease to get the color I wanted.
Step 3:

Click image to enlarge.
After that, I applied a shimmery, rose gold eyeshadow. I used e.l.f. Baked Eyeshadow ($3) in “Toasted” (one of my all time favorite eyeshadows) with the shadow brush (the e.l.f. Essential Eyeshadow Brush will work). I wet my brush, yes wet it, then picked up the product from the pan.
Baked makeup, such as the eyeshadow above, was formulated to be used wet. So don’t worry about ruining your eyeshadow, because it was made for it. By using the eyshadow wet, it will increase the intensity and make the shimmer in the product POP! That’s why it’s one of my favorite eyeshadows.
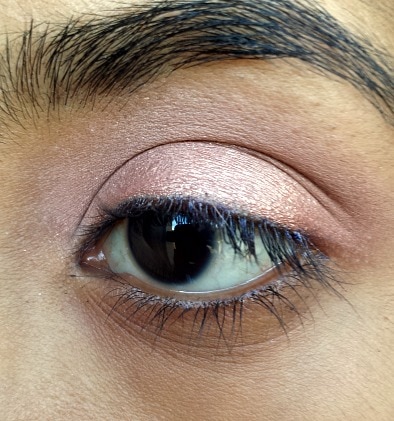
See how shimmery the shadow looks?
Step 4:
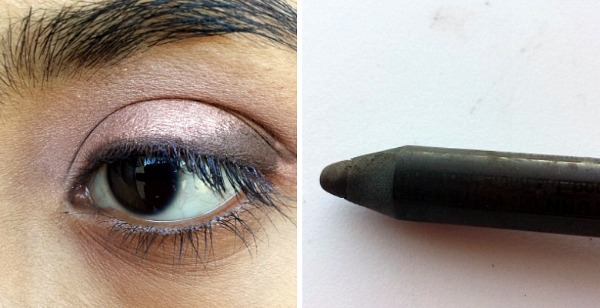
Click image to enlarge.
Next, I took a brown eyeliner – I’m using the NYX Slide on Pencil ($8) in “Brown Perfection” – and lined my upper lashline. I also used the eyeliner to create a thicker line, and “shade in” the outer corner, as shown in the picture above.
This will serve as our dark outer corner color, so feel free to only apply a little if you want to go for a more subtle look or add more if you like the smokey look. As always, you can adjust the look as needed to suit your personal taste!
Step 5:
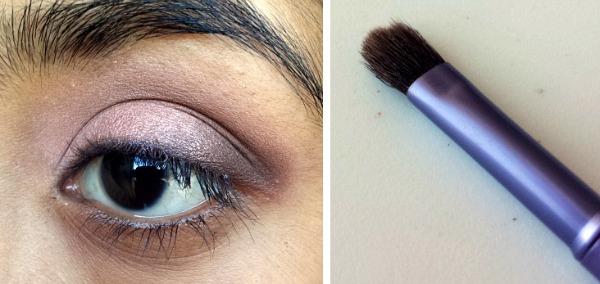
Click image to enlarge.
I then used a small smudge brush – Real Techniques Mini Shading Brush from their Mini Brush Trio ($10) – to smudge and soften the outer corner. I added mascara to my top and bottom lashes, then smudged a bit of brown eyeliner on the bottom.
For Nighttime:
I know the daytime look had a lot of steps, but the nighttime look only requires three additional steps. Simply add on to your daytime eye makeup for a sultry night out look. Also, you only need three products, so don’t worry about lugging your entire makeup collection in your purse.
Eye Makeup:
The first thing you need is tape. Yes, you read that correctly, tape.
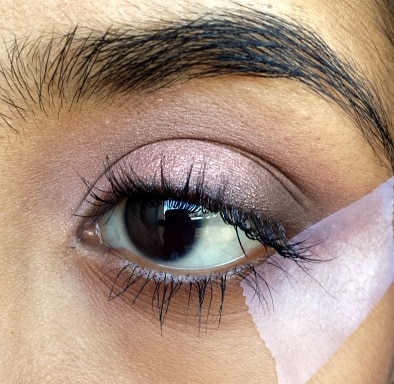
Tear off a piece of clear tape, then slap it onto the back of your hand to get rid of any stickiness. Align it from the bottom of your lashline to the the end of your eyebrow, as shown above. This will be our guideline to create a darker smokey eye, and also doubles as a guideline for winged liner.
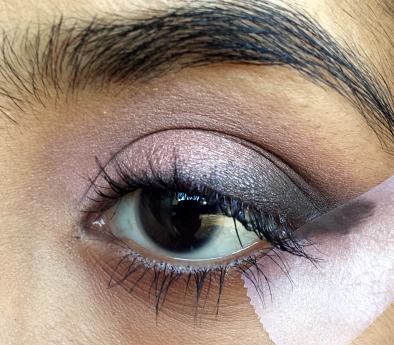
Next, you’ll need a black eyeliner. I used the NYX Slide on Pencil ($8) in “Jet Black.” Just like how I smudged out the brown eyeliner earlier, do the same with a black liner, using the tape as a guideline. Don’t feel bad if you went onto the tape, because that’s what it’s there for, to catch any possible mistakes.
Then the third thing you’ll need is a small smudge brush to smudge out the black eyeliner. I’m using the same one I used earlier. Again, if you don’t want to go too heavy, then use little bit of liner. If you feel extra vampy, then go heavier on the application. Fit it to your mood!
The Finished Look:
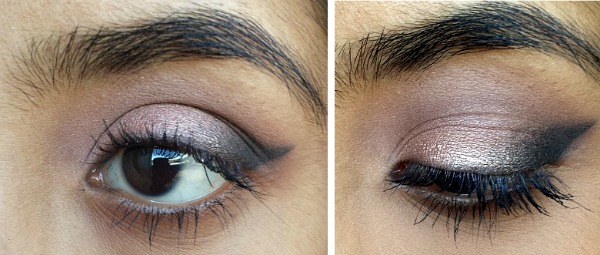
Click image to enlarge.
This is how it should look like once you’ve taken off the tape. If you want to have a hard edge, then take your liner and press it against the tape. That way, when you remove it, it’ll leave you with a sharp line.
Lip Color:

Click image to enlarge.
I wanted to show you two different lip options. If you’re feeling sultry, then go for a berry red. On the left, I used the Rimmel London Show Off Matte Lip Velvet ($5.99) in “Meteroic Matte.”
I you want to follow the “one focus” rule (a.k.a. making either the eyes or lips the focus) then try a neutral lip color. On the right, I’m using the Wet ‘n’ Wild Fergie Velvet Matte Lip Color (can you tell what my favorite lip finish is?) in “Timeless Chick,” which you can find in Walgreens stores for $3.99.
What do you think?
I hope Michelle and I helped you to create the perfect Valentine’s Day look! What lipstick are you wearing for Valentine’s Day? Will you try out this makeup look? Let me know in the comments what you think. If you have any questions then ask away and I’ll do my best to answer them. Until next time, ciao!